Thursday, 17 October 2013

Melted Crayon Pictures and Sun catchers


Since I had the crayons, graters and iron out for the last step of our Monet Paintings (click here for that post) I decided we should do some melted crayon paintings along with one of my all time favourite crafts, melted crayon sun catchers.

1. Melted Crayon Paintings (with watercolours)

What you need:
  • Crayons
  • Mini graters
  • Wax Paper
  • Iron (or hairdryer)
  • Watercolour paper
  • Liquid Watercolours
  • Salt
  • Oil pastels
  • Permanent markers
Close up of melted crayon combined with watercolour and salt
How to:
  • Hand out watercolour paper
  • Ask the children to draw a picture in permanent markers or oil pastels on their paper
  • Hand out crayons and graters
  • The children can then grate the crayons onto their pictures.
  • They will need to use their fingers to push the crayon into the place they want.  Some may choose to do a more abstract painting, that's Ok just let them enjoy the process.
  • Place a sheet of wax paper over the crayon shavings and then iron or use a hairdryer to melt the wax.
  • Paint a layer of liquid watercolour over the melted wax painting to add a background and more colour.  The wax will resist the paint and show through.  
  • I provided salt as well if they also wanted to add a speckled look.
The Results:
Pretty cool hey?
I had one student who was away at the end of last term so she did her Monet picture using this technique.  It turned out beautifully.  A great alternative for a Monet lesson when time is limited (easily done in 40 mins).


 2. Melted Crayon Sun catchers 


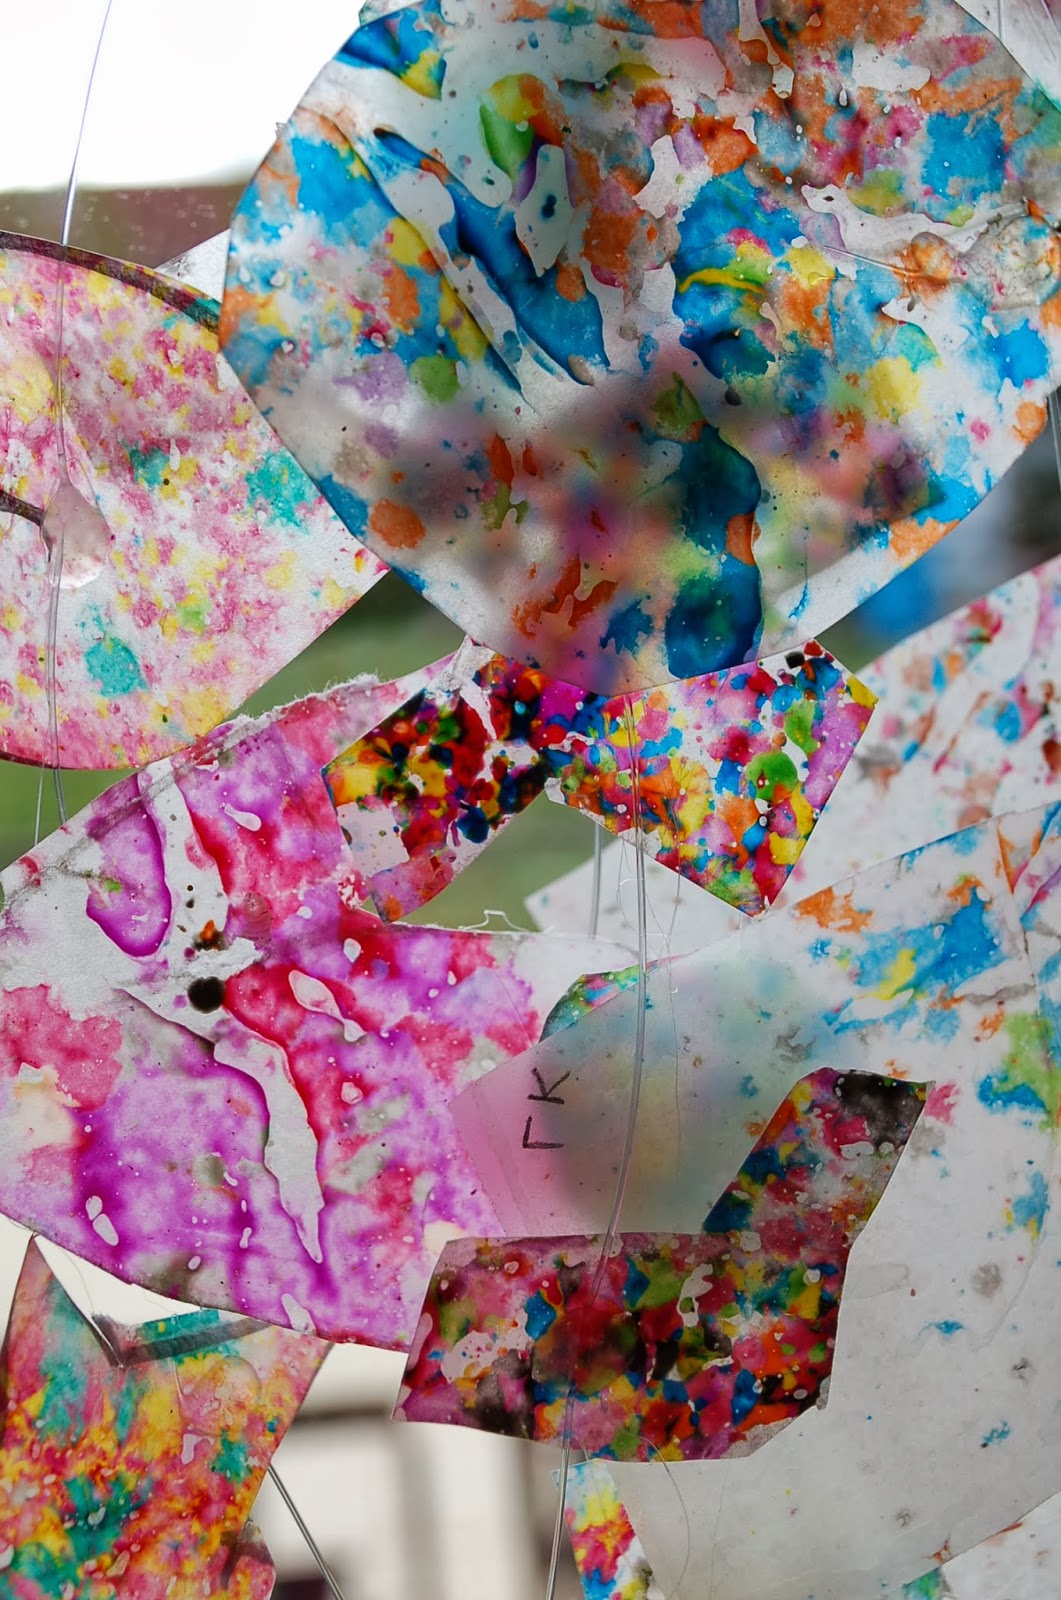
This idea comes from Martha Stewart.  Click here for her post.

What you need:
  • Crayons
  • Mini graters 
  • Wax Paper
  • Iron or hairdryer
  • Hot glue gun
  • Fishing line
How to:
  • Fold a piece of wax paper in half
  • Open up, grate crayon onto one half then fold over the clean side so the crayon is wedged between the two pieces
  • Melt with iron or hairdryer (I did this step however the children loved to watch this and see the crayons melt)
  • Cut out into shapes (I let the children do what they wanted here, some chose one large shape, others did lots of small shapes)
  • Use a hot glue to glue the shapes onto a piece of fishing line (I did this step)
  • Hang up and admire (I just used blu tack to attach to window)
The Results:
Very pretty with the sun shining through....


Note: Wax paper is available from Coles

Cheers
Fiona

Sunday, 13 October 2013

Monet's Japanese Bridge painting in acrylic and melted crayon


The Monet exhibition has just finished in Melbourne. It was wonderful!!  I've been wanting to do a Monet inspired painting all year yet decided to leave it until now to maximise the number of children who would have seen the exhibition first.  It was very inspirational.

I've been debating about how to go about this painting for a while.  I decided to do it in three steps to maximise the thickness of paint and ensure the children took their time.

Week One - Paint background
Week Two - Paint water lilies, trees, pond and bridge
Week Three - Melted crayon added to further impressionist effect


Close up of the melted crayon - so pretty!

What you need:
  • Canvas board (I used boards so the paint could be added thickly)
  • Acrylic paints
  • Brayers, rollers, old cards, paint effect tools, bubble wrap etc (really anything you can think of that creates good effects)
  • Paintbrushes in various sizes
  • Crayons
  • Wax Paper
  • Iron (or Hairdryer)
  • Mini graters (purchased cheaply from Kmart)
How to:
Week one:
  • Hand out the canvas boards and a sheet of plastic (I used cheap Ikea chopping boards yet plastic dividers would also work well).
  • Put a squirt of blue, yellow and green/ aqua paint on the sheet of plastic.
  • Ask the children to put the paint on their canvas with the brayers, credit cards etc by rolling/scraping them in the paint on their plastic then onto the canvas.  Tell them we are looking for a mottled look with all colours showing.  They could use the bubble wrap and other paint effect tools for this as well.  The idea was just to enjoy the process of making a fun mottled looking background. They found this part LOTS of FUN!
Week Two:
  • Demonstrate how to draw a bridge and then get the children to paint in their bridge.
  • Demonstrate a dabbing technique and get them to paint in flowers, water lilies and trees.
Week Three:
  • Hand out mini graters and crayons
  • Ask the children to grate crayon onto their paintings (they can move the shavings around with their fingers).
  • When they are happy with their arrangement, cover with wax paper and melt crayon with a hair dryer or iron (I did this step for them).
  • Peel off the wax paper to reveal the final masterpiece.
The Results:
I love how these turned out! These were done by children aged 5 to 9 years.  It was a great exercise as the children learnt:

1) How to apply paint without a brush
2) How to use an impressionist dabbing technique to add flowers and foliage
3) Mixed Media technique by adding melted crayon for another effect


Cheers
Fiona


Sunday, 6 October 2013

Paper Mâché Owls - Part 2


This is the second part of my Paper Mâché Owl post click here to see Part One.

The children (aged 5 to 9 years) have finally completed their owls.  They worked on these for 5 weeks!!  However it's only been 10 - 20 minutes at a time.

Week One - First layer of paper mache 
Week Two - Second layer of paper mâché (white paper)
Week Three - Paint base colour 
Week Four - Paint features
Week Five - Add glitter, sequins, eyes and further details.

I coated them with Mod Podge prior to sending them home.

The Results:


A couple of things I would do differently next time to cut down time:
  •  I would use a layer of coloured paper rather than white, this eliminates the need to paint a base coat.
  •  I would possibly not paint them at all yet instead offer materials to stick on the owls (fabric cut out in wing shapes), felt hearts, cut out or goggle eyes, paper beaks, painted paper shapes, sequins etc etc. (children really struggled to paint the round shape in detail).
The children LOVED doing Paper Mache and it was nice to just do a little bit on them each week.  With the rice in them they shake like maraca's and rock about on the table if you push them.

Cheers
Fiona


Sunday, 8 September 2013

Having loads of FUN with Yarn / Wool......


Ohh my are we just loving yarn at the moment... I can't get enough of it and neither can the children.

This is what we have been doing:
  • Lots of finger knitting  
  • Yarn weaving 
  • Yarn snakes.  
  • Yarn Sticks  
  • Yarn Rocks
* We have been working on these ALL term as I have been using these activities at the end of sessions when the main project has been completed.

our table centre piece with yarn work hanging off it.

We have been talking about "yarn bombing" (see earlier weaving post) and I've even started to yarn bomb our garden trees with all the finger knitting that is accumulating.  There is SO much you can do with beautiful colourful yarns.  If you are looking at more ways to use yarn check out the The Artful Parent who by pure coincidence just did a post on this.


Yarn Weaving
I made my own cardboard looms for these as I had some cardboard offcuts given to me.  With some experimentation with my own children I found the easiest way for the children to weave the yarn through was to wrap it around a piece of cardboard the width of the loom (use a small slit to hold yarn in place to start).  Once the weaving has been completed, cut the yarn in the middle across the back of your loom, knot the threads together at the top and add beads if you wish.


Finger Knitting
I was teaching my daughter how to knit yet it was proving difficult and a friend mentioned finger knitting.  That started a huge trend in our house, at art classes and at my daughters school.  Finger knitting is a great craft to teach young children.  My daughter who is nearly 8 has really taken to it.  Finger knitting with one finger is the easiest and the best way to start yet once they have got the hang of it you can teach them how to do it with more fingers.


Yarn Snakes
These were inspired by this pin.  It didn't link to instructions so we just worked it out.  The children drew a snake on cardboard then cut it out.  We then sticky taped the end of some yarn onto the snake and they wrapped it around and around.  When they wanted to change colour we just cut the yarn and sticky taped the end to the cardboard then started again with a new colour.  You just need to ensure that you wrap the next yarn over the end and start points so you can no longer see it.  I used the hot glue gun for either end to ensure the yarn stayed put and for gluing on button eyes and a felt tongue.


Yarn Rocks
These were inspired by this pin.  It sounds really simple, just cover the rock with tacky glue and then wrap the yarn around.  However it's actually hard to do without getting glue everywhere and keeping the yarn looking neat.  The below photo is of my rock the kids decided it was too hard.


Yarn Sticks
These are all over Pinterest click here and here for some great examples.  It is a similar concept to the previous two examples.  I used a the same process as the snakes.


Cheers
Fiona


Sunday, 1 September 2013

Clay Faces for Father's Day


I've been fortunate enough to go into my daughters classroom over the past few weeks to do an art activity with the children.  Its been lots of fun and they have been perfect students. 

We recently made these clay faces.  I'm really pleased with how they turned out. 

The faces are made out of paper clay (normal clay with paper pulp added to give extra strength when dry).  I supplied each child with a ball of clay and a wooden skewer and they created them from there.  The children painted the hair and skin colour when the clay was wet.  The following week the children added a few more features with paint and a background on cardboard with oil pastels.  The final step was to glue the clay face to the cardboard and cover it with Mod Podge to give it a gloss finish (photos prior to this step).  The children also wrote about their dad and it was glued to the back.


 If you notice a few animals in there we used the book "My Dad" by Anthony Browne as inspiration and children were told they could represent their Dad in any way they pleased.


Nice work kids!

Cheers
Fiona

Underwater Seals and Hippos


Aren't these underwater seals & hippos just the cutest??

Of course two wonderful ideas from Deep Space Sparkle.  The seals were part of the first e course I did and the underwater hippos are on her website click here for instructions.

I gave the children the choice of doing either animal.  As usual we had a few that deviated from the instructions yet I like that creativity.  All the children's art is shown.  Paintings done by 5 to 9 year old children.  After these photos were taken the children added fish, jellyfish, seaweed etc out of painted paper and tissue paper to jazz them up even more.


To tie in with the underwater hippos theme our artist of the week was Melanie Mikecz who illustration inspired Patty to develop the underwater hippo art lesson.


Cheers
Fiona