Wednesday, 18 December 2013

Making Christmas Decorations

Find it Decoration, Painted Porcelain Decoration, Salt Dough chains and some finger knitting on our tree
I love Christmas its an exciting time of the year to really get into art and craft.  Our house just goes crazy..  I've done homemade Christmas decorations with my children since they were really little.  I love a tree with odd bits and pieces and lots of things made by children.  My children also decorate the tree so its usually a bit of a jumbled mess with lots of decorations at the front and at kid height (which is why it has toppled over on occasion).

The jumbled mess of our Christmas Tree
So its no surprise that I themed a lesson on making Christmas Decorations...

Below is a list of what we made and YES we actually made ALL of these in one lesson.  There are going to be some lovely looking Christmas trees in Bentleigh this year!

1. Find It Christmas Ornament

This idea came from this pin.  So easy yet so effective.  My children love asking people to find all the things in their decoration.   The clear globes can be bought from art and craft stores.  There are lots of other things you can do with these clear globes.  Check out this site for some wonderful ideas.  We just filled them with things I had in the art room, pipe cleaners, feathers, Christmas sequins, normal sequins, glitter, tinsel, beads, buttons, ribbon and googly eyes.  The children wrote / drew their lists as they filled the globes.  Some children also decorated the globes with permanent markers.


2. Porcelain Christmas Ornament
I happened to have my Porcelain paints out after I got my Saturday class to paint plates a few weeks ago (pic below)
  
I then stumbled upon these beautiful porcelain Christmas ornaments at the shops.  So the Tuesday and Thursday classes got to paint these.  They turned out really well and look great hanging on the Christmas tree.


3. Salt Dough
Always a favourite in our house.  Click here for a previous post and the recipe.
I'm really happy with my method of painting with watercolours before they dry and then sprinkling with lots of glitter.  I then place them in the oven to dry,  finish off with a layer of Mod Podge and add some string.   This enables it all to be done in one lesson.  We used Christmas shaped cutters, Christmas stamps and pony beads to decorate. My daughter also came up with the idea of doing lots of little stars to glue along a string.  We have a few of these strung around our tree like tinsel.  We also attempted a few 3D ones using some 3D cutters I had. 

The Artful Parent just did a post on melted crayon salt dough decorations - that's now on my to do list for next Christmas!


Early finishers also made:

4. Melted Crayon Paper Chains
This is another wonderful idea from The Artful parent and can be found in her ebook Winter. Simply make melted crayon paper, click here for my post on how to do this.  Cut into strips and make into a chain. (Sorry forgot to take a pic as currently hanging in the art studio).  Poppy also made normal paper chains with coloured paper, including the big one hanging on our tree (in pic above).

5. Finger Knitting Chains for the tree
Yes the finger knitting frenzy continues in our house and in art class, will it ever end???  We now have finger knitting on the Christmas tree..


6. Pipe cleaner Decorations
Very easy yet a goodie.  Simply thread pony beads onto your pipe cleaner, bend into a Christmas shape (or not) and hang on your tree.


Wishing everyone a wonderful Christmas and a safe and Happy New Year!

Cheers
Fiona

Monday, 16 December 2013

Advent Calender

Do you have an Advent Calender in your house?  My kids just love ours.  We made one last year from toilet paper rolls and used it again this year (yes a little lazy...) yet it still looks good along our stairs...  I found the instructions on the "Instructables" website click here for the details.  

I fill it with activities that change daily, such things as sing carols, go for a bike ride, decorate the Christmas tree, bake gingerbread cookies, make a new friend, go and look at the Christmas lights etc etc.  I also fill some days with a chocolate frog to keep things exciting.  Our frogs have been know to "hop" to another day if children haven't been good though!

Here's a pic:


Cheers
Fiona


Sunday, 15 December 2013

More fun with Shaving Cream Marbling

I've had quite a few requests to do this activity again.  This was one of the first lessons I taught and although it was mayhem it was fun and the kids just LOVED the mess and playing with the shaving cream...

Click here for my previous post and instructions.

This time I selected each child's best marbled piece and laminated it.  I suggested that they could then use this for a book, cut it into Christmas decorations or make gift cards. 

Here are some of the results:


Cheers
Fiona

Saturday, 14 December 2013

Blue Dog

I have to admit I hadn't really heard about "Blue Dog" until I entered the world of art ed websites / blogs.  Then I started seeing references to it everywhere.  After a little research I learnt that artist George Rodrigue was responsible for this Blue Dog phenomenon.  He has painted Blue Dog in many ways and in many places.  His foundation the George Rodrigue Foundation does wonderful work in helping cultivate creativity in youth.  I just love the fact that Blue Dog is an unusual colour, this resonates so much with what I teach, that you can paint things whatever colour you like.  He has a few wonderful books which are now on my want list - Why is Blue Dog Blue? and Are you Blue Dogs Friend?


Before class we watched a video about George Rodrigue click here for the link.  I just love how he says that you need to listen to your heart and paint what you want, needless of what others tell you.  You need to paint for yourself.  Wonderful stuff!


Here are our Blue Dog pictures created by my Tuesday and Thursday classes.  We used a black sharpie to do the outline and painted with tempera paint.  I demonstrated how to draw a dog on the whiteboard for the children that needed some help.  Children were instructed to draw anything into the background of their blue dog and we took this opportunity to discuss how sometimes artists put messages into their paintings if they are passionate about things.  Of course Blue Dog doesn't really have to be blue which is why some are not.......Also with Christmas just around the corner many have a Christmas feel to them.

Cute!


Our artist of the week was George Rodrigue.  Here is one of his famous paintings of Blue Dog.  You can view others on his website click here.


Cheers
Fiona

Sunday, 1 December 2013

Chalk Pastel Owls (with glue outline)


I'm still in love with chalk pastels.  They really can produce wonderful results for the children and I love seeing the smudged pastel on their faces afterwards.  Its always been a good art lesson when the kids are messy afterwards.


I've been wanting to use glue with chalk pastels all year as there are so many wonderful examples of this on Pinterest.  I'm pleased we finally got around to it.  It takes some planning though as the children need to draw and paint their outlines in glue one week and then colour in the picture the following week.  

What you need:
  • Black A3 paper
  • Glue in bottles (we used Elmers)
  • Pencils
  • Chalk Pastels
  • Fixative / Hairspray (optional)
  • Black Oil pastels (handy to have on hand for those children who were away the first week)
How to:

Week one:  Demonstrate how to draw a simple owl (I showed them wings in or out versions).  Draw this with pencil on the black paper then get the children to trace over this with the glue.  Younger children find controlling the glue whilst squeezing the bottle a little difficult.

Week Two:  Using chalk pastels colour in the picture covering all the black paper.  When finished spray with fixative or hairspray (optional).  Tip:  Use a wet cotton tip to clean the glue lines afterwards (you could get the children to do this themselves yet I did it for them mainly because I forgot to ask them to do it yet I also enjoyed doing it so I could admire their work..)

The Results:

Very cute.  These are produced by children in Prep and Grade 2!


NOTE: Notice the picture on the bottom left?  I had one bottle of clear Elmers glue out and this one used this.  The black glue lines show up much better!  However it isn't non run and it did run a little (maybe we didn't dry it completely flat?). The Elmers standard white glue did dry with a few bubbles too.

To finish the lesson (as I have very fast artists) we also worked on a second chalk pastel using a black oil pastel as the outline.  It was a free choice for my Tuesday group and the Thursday and Saturday groups worked to an insect theme.  I expected them to each do one big insect, yet the results show that you can never expect a certain result in art.  There were trees, leaves and multiple insects drawn.  Still all lovely and creative.


Our artist of the week was Pamela Pretty, a local pastel artist. Click here for her website.  Pamela's painting "Lofty " recently won the "Best in Show" award at the Pastel Society of Victoria annual exhibition.  Many of her paintings are of local places I've been and I love her style. She loves to paint "en plein air" where possible to capture the mood and colours of the places she visits. Her main media are oil and pastel and her subjects are usually landscape, seascape and dramatic skies.

Cheers
Fiona


Thursday, 21 November 2013

Aboriginal Painting and Making our own Paints


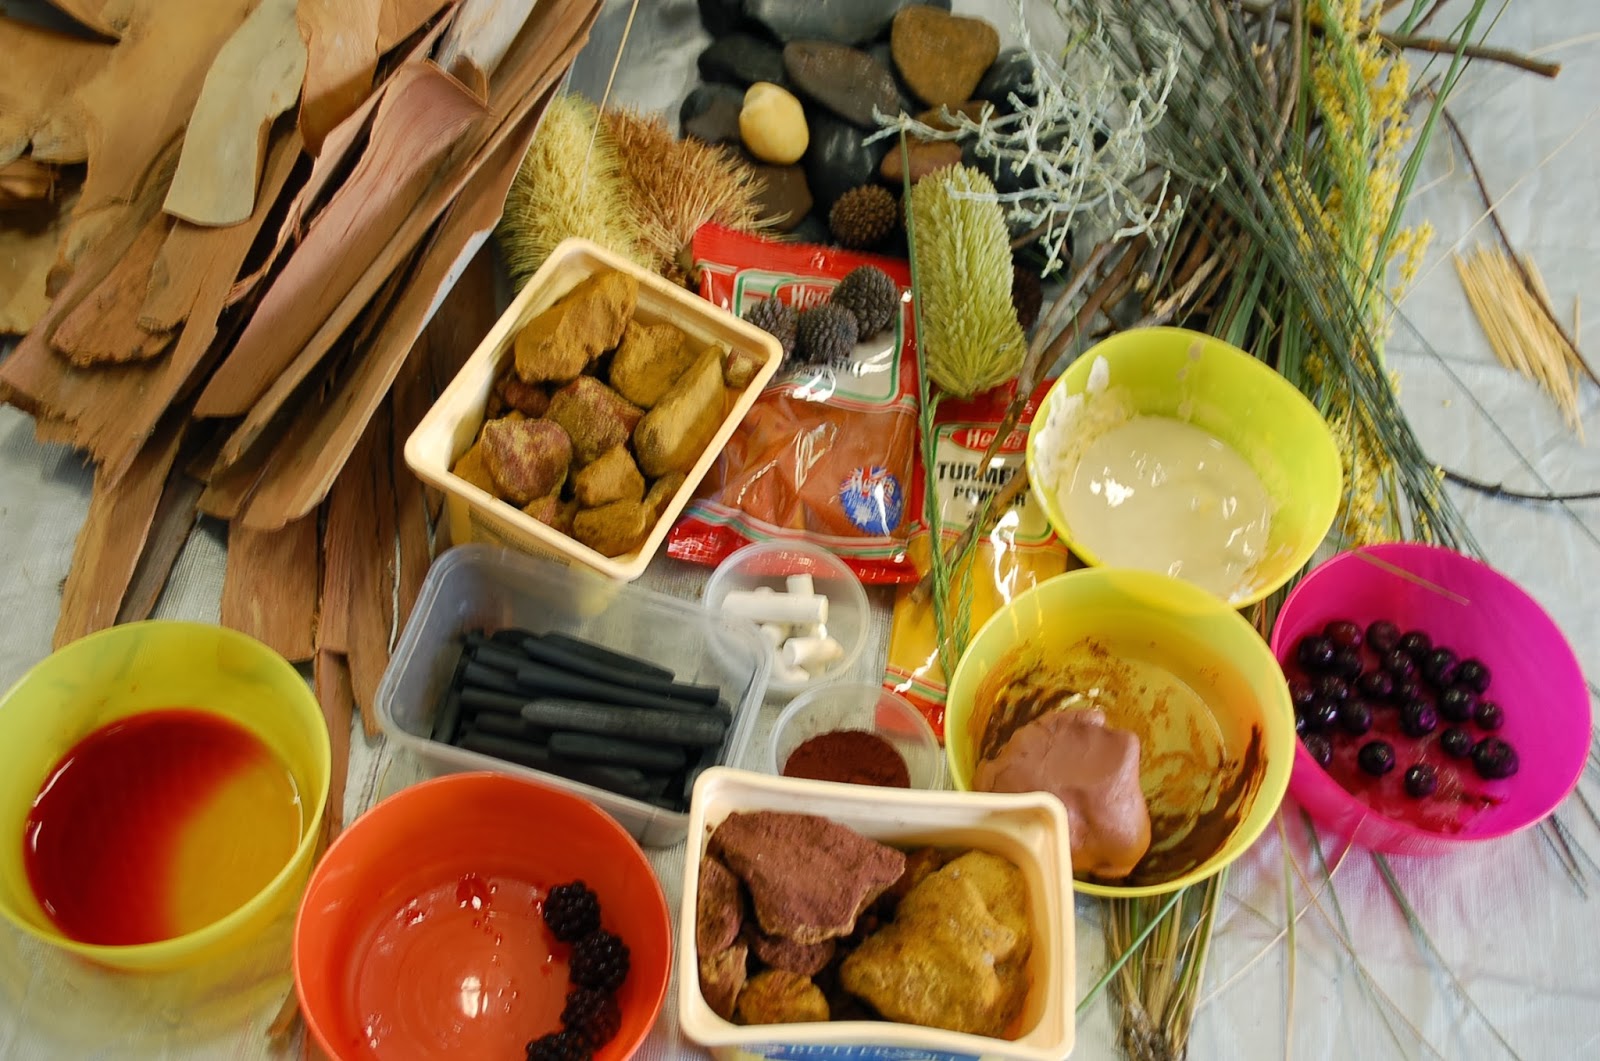
My children are often found crushing up rocks and making them into paints so I thought this would be a fun idea to incorporate into an art lesson.  Making your own paints is very messy yet lots of fun.  I've also been wanting to do an Aboriginal themed lesson and have been storing bark pieces for nearly a year in anticipation.  Naturally these ideas go extremely well together as many of the early Aboriginal paintings were done with natural materials such as clay, berries, charcoal, chalk, and coloured rock.


I'm lucky to live near some lovely red / yellow / orange cliffs called "Red Bluff".  I went for a walk along the beach one morning and gathered up some pieces of rock lying around on the sand (along with some pebbles for painting on).  I also gathered some natural materials to paint with - banksia flowers, leaves, sticks, grasses, pine cones and seeds.

Part One - Making our own paints

We discussed as a class what materials natural paints could be made from then progressed into making our own from the materials on the table.  I supplied the following:
Charcoal - Black
Red rock, paprika, red clay, iron oxide - Red
Turmeric, yellow rock - Yellow
White clay, chalk - White
Blue Berries, Black Berries, Beetroot juice - Purple / Pink

The children used a mortar and pestle to crush the rocks into a fine powder.
I supplied lots of plastic bowls, spoons and jars of water to mix the paints in.
For a "binder" to make the paints stick to the paper we used glue, cornflour and water paste or egg mixed in with the paints.  Traditionally tree sap was often used.

This was all rather messy with lots of washing up to be done afterwards yet was lots of fun
Supplies for making our own paint
Part Two - Painting with our Paints

The children were then handed white or black paper (their choice) to draw an Aboriginal design on.  We discussed how symbols were often used (I handed out a page with some example symbols on it) and how Aboriginal paintings often tell a story.  We also discussed Native animals children could draw and I had some templates on hand if they wanted to draw around these.  Dot painting was also discussed.  I pretty much left it to them to do the paintings how they liked.  Although I encouraged them to take their time and give a dot painting a try many just added a few dots or did a more abstract painting.  I had visions of beautiful slowly done dot paintings yet with children aged 5-9 years this was probably a bit over ambitious.


We had no paint brushes on the table so they could paint with the natural materials (although I also supplied some cotton tips).  The natural paints are not the easiest to paint with so I had some normal paint in natural colours on hand if anyone got a little frustrated.

We also painted on the bark and pebbles.  Some children painted the animal templates.

Painting on bark

Painting on rocks / pebbles

Painting animal templates

Part Three - Hand Prints

As a final step we discussed how hand prints are often found painted on rocks and in caves.  This is done by blowing white paint / chalk through a long wooden tube.  We did our own version of this by spraying watered down white paint over hands placed on some brown packing paper.


Our artist of the week was Aboriginal Artist Michael Jagamarra Nelson.  Click here for his biography. 

Cheers
Fiona


Wednesday, 20 November 2013

More Seahorses

A few weeks ago Tuesday was Cup Day in Melbourne so with only two classes to teach I decided to mix things up a bit.

The Thursday class missed out in doing Seahorses last term when they had a public holiday and I've had a few requests.  Click here to see my previous post and instructions.

Here are the results:
I love how these are so bright and colourful.  We forgot to add glitter to some of these yet they are beautiful anyway..

Watercolour Seahorses by 6-9 year olds
I decided to teach the Saturday class some colour theory since they are all new to my classes and we hadn't done any yet.  I repeated the lesson on "Colour Theory, Paul Klee and Painting on old book pages".  Click here for that post.

Cheers
Fiona