Thursday, 9 April 2015

Beautiful Holiday Workshop Art


Here's what we created today in my holiday workshops.  I thought I might have been a little crazy in the head scheduling 3 workshops in one day yet amazingly it all went really well.  It was so lovely seeing the kids create such wonderful art.  They were all so enthusiastic it gave me such a thrill.  I do love my job!

Check out what they produced!

Plasticine Pictures:


Oil pastel cows:


Oil pastel and wool lions:


Watercolour Flowers:

Watercolour Hearts:


Remember to keep creating over the holidays!

Cheers
Fiona


Thursday, 2 April 2015

Watercolour Easter Bunnies & Eggs


I just loved the Reindeer's we did at Christmas time so when I spied that ARTventurous had done an Easter Bunny version as well I knew I had found our perfect Easter artwork.


These are so cute!

1. Easter Bunnies & Eggs

What you need:
  • Liquid Watercolours
  • Oil Pastel - black
  • Brushes
How to:
  • Demonstrate how to draw a bunny as instructed on ARTventurous.  I also did a little handout for the children. I don't like telling children they have to draw a certain way so my handouts are only there to follow if they wish.  Some children choose to draw the whole bunny.
  • Draw the bunny with black oil pastel (or marker for older children)
  • Paint with watercolours (I encouraged at least two colours in the background)
  • Early Finishers also drew and painted a watercolour Easter Egg
The Results:


2. Painted Wooden Eggs

We also painted some wooden eggs this lesson.  I love how these didn't break when the kids dropped them (and they did....).  I think over 50% of my eggs were broken when I tried decorating boiled eggs last year.  Another bonus - these ones last forever!


What you need:
  • Oil pastels
  • Liquid Watercolours
  • Wood eggs (I got mine from Clever Patch)
  • Brushes
How To:
  • Decorate Egg with oil pastels
  • Paint with liquid watercolours
The Results:


Happy Easter Everyone!

Cheers
Fiona

Tuesday, 31 March 2015

Magazine Dogs

These dogs were inspired by artist George Rodrigue, who is famous for his Blue Dog painting.  They are also inspired by Samuel Price an artist who uses magazine pieces to produce the most amazing dog artworks.

We started this lesson when all the magazines were out for our magazine fish artworks.

What you need:
  • Old Magazines to cut up
  • Glue
  • Scissors
  • Black oil pastel
  • Paints
  • White A3 paper
 How to:
  • Speak about both artists
  • Read George's book "Why is Blue Dog Blue?"
  • Draw the dog in black oil pastel (I had a handout to help them draw blue dog if they were a little stuck)
  • Choose what colour the dog is going to be and start ripping / cutting up magazine pieces in that colour and gluing onto the dog.  
  • If the child is finding it hard to get enough pieces to "fill" their dogs with magazine pieces I gave them the option of using paint to fill in the remaining white bits.
  • They had the choice of doing the background with paint or more magazine pieces
The Results:


Cheers
Fiona

Sunday, 29 March 2015

Near and Far Houses


This was a lesson I learned as part of my e course with Deep Space Sparkle  a few years back.

It was a great lesson to have on hand as it further illustrated what the children had just learned in our Poppy Field Paintings.   Objects that are close to you are large.  Objects that are far away from you are small.  As an object gets further away it gets smaller and smaller.  We applied the same technique we used for poppies to houses.

What you need:
  • A3 white paper
  • Tempera cake paints
  • Black oil pastels
How To:
  • Draw three houses getting smaller as they get further away with the black oil pastel
  • Paint
The Results:


Cheers
Fiona

Friday, 27 March 2015

Painted Fields of Poppies


These lovely fields of poppies artworks were inspired by these two paintings:

Van Gogh:
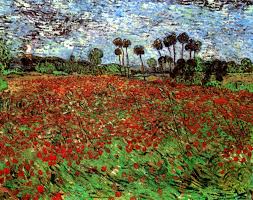

Monet:
 Image result for monet field of poppies

At the start of the lesson we talked about the artists and their style of painting.

As always I had to do a search for other art lessons on poppy fields and I really liked the one by Splats, Scraps and Glue Blobs so this lesson also took inspiration from their lesson.  Thank you!

I like to mix up materials as much as possible during the term so for these paintings we used Canvas Paper (I like the Monte Marte one) that I taped to pieces of MDF.  The texture of the paper also adds to the lovely final product. It's not evident from the photos below yet by taping around the paper the final product has a white frame which looks great.

I'm really happy with how these worked out and I'm going to frame my children's for sure.


What you need:
  • Canvas paper taped onto wooden boards (you could use normal paper instead)
  • 3 different Green acrylic paints
  • 3 different Blue acrylic paints
  • White, Yellow, Red and Black acrylic paint
  • Paint brushes
  • Oil Pastels
  • Photographs of real poppies and poppy fields

How To:

We worked on these over three weeks, doing just a little each time.

Week 1: 
  • Ask the children to draw a horizon line across the paper about one third down.
  • Paint the grass making sure they use all three greens (grass is painted vertically)
  • Paint the sky making sure they use all three blues (sky is painted horizontally)
  • Paint in clouds using the white paint
  • Paint in yellow flowers using the yellow paint
Week 2:
  • Using oil pastels (I had three green and three different blues again) ask the children to add further lines to their works remembering that the grass runs vertically and the sky runs horizontally.
  • They could also use white and yellow pastels to add more clouds or yellow flowers
  • Using the red paint,  paint in the poppies (We practised drawing poppies using perspective with the big ones at the front and the little ones at the back in our visual diaries first).
  • Using the black paint,  paint in the middles of the poppies
Week 3:
  • Using oil pastels again add highlights to the poppies using red and orange 
  • Add yellow centres to the poppies or anything else that is missing
The Results:
Stunning!


Cheers
Fiona


Wednesday, 25 March 2015

Paint and Oil Pastel Jellyfish


These are inspired by this pin.  Thank goodness for Pinterest hey?  I think that sentence is how I've started my last three posts.  Not that I'm a Pinterest junkie or anything (ahem....).

What you need:
  • White A3 paper
  • Cool Colour Paints (I just used a set of 6 cool colour Tempera cakes that I have)
  • Big Paintbrushes
  • Oil Pastels (ensure there is white)

How To:
  • I asked them to paint their backgrounds by using every colour in the paint pan.  This ensured there was a mix of colour in the background.
  • Leave to dry (we left it to the next week)
  • Draw on jellyfish using a white oil pastel 
  • Use coloured oil pastels for further details if they wish

The Results:

Jellyfish can be so pretty....


If you have any children away for week one when you paint the backgrounds, this lesson also works really well on black paper - check this one out:


Cheers
Fiona

Tuesday, 24 March 2015

Oil Pastel Bubbles


 There have been a few pins floating around Pinterest lately with bubble pictures.  See here and here and here

They look great and what an excuse to have some fun with bubbles before class!   I also used this lesson as the perfect excuse to buy a bubble machine and bubble gun...we are all children at heart!  I'm trying to keep them for myself yet my children seem to want them too!


What you need:
  • Black Paper
  • Oil Pastels
  • Lids of different sizes
How To:
  • Blow / use machine to produce bubbles and get the children to observe them (not pop or chase or bump into them....good luck with that!).  Ask them what colours do they see? Are they all the same size? Are some joined together? Can you see where the sun hits them? Can you see through them? Do they all have the same colours? 
  • Then ask the children to trace the lids with a white oil pastel.  Encourage them to do some half off the page, some overlapping and to use different sizes.
  • Add colour with coloured oil pastels
The Results:

Bubbles are so cool!


Cheers
Fiona